How to Copy, Paste, Upload, and Download in an Exercise Environment
Info
Virginia Cyber Range exercise environments allow instructors and students to copy/paste text into an environment and upload/download files. The file upload/download feature can be accessed through the side panel accessible within your exercise if it has been enabled for your exercise. For optimal performance with the Cyber Range, we recommend using Google Chrome or Firefox as your browser.
Opening the Copy/Paste/Upload Side Panel
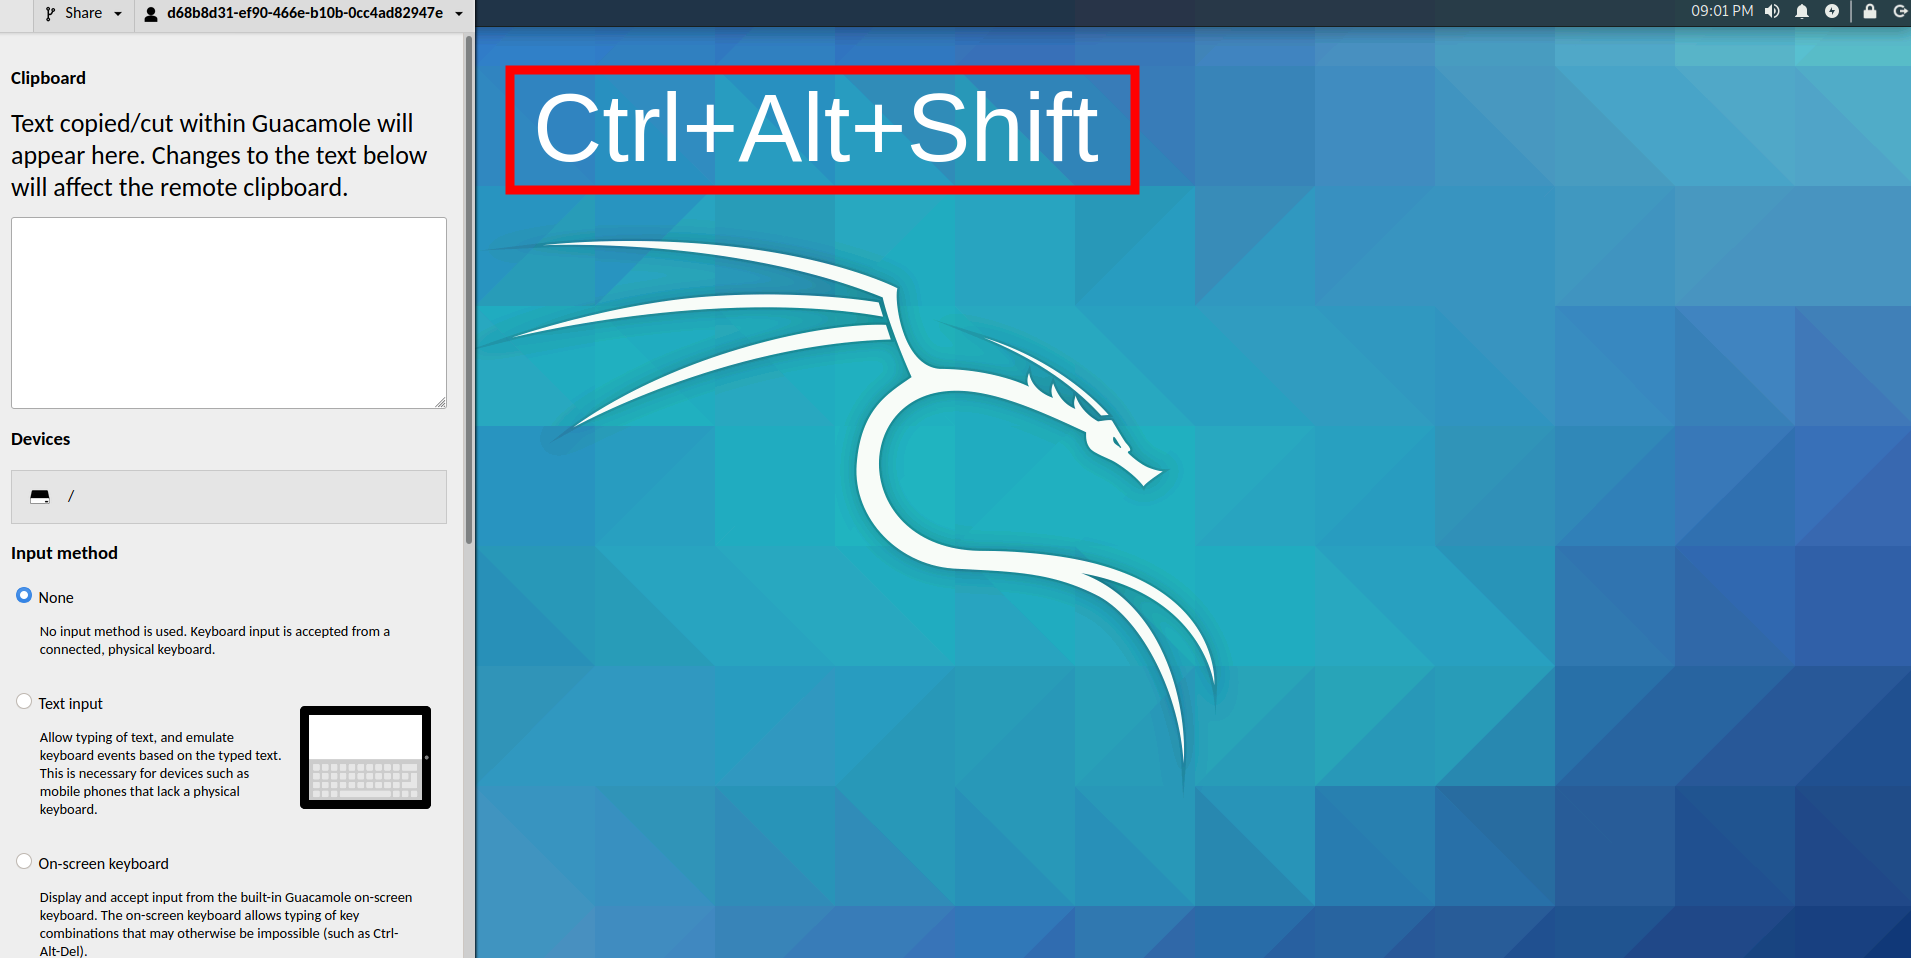
Press Ctrl+Alt+Shift (Ctrl+Option+Shift for macOS) to open the side panel within your exercise environment. You will then be able to see your Clipboard, a button with your “devices”, and other keyboard/mouse options below. A screenshot of this view is shown below.

Copy & Pasting In and Out of Exercises
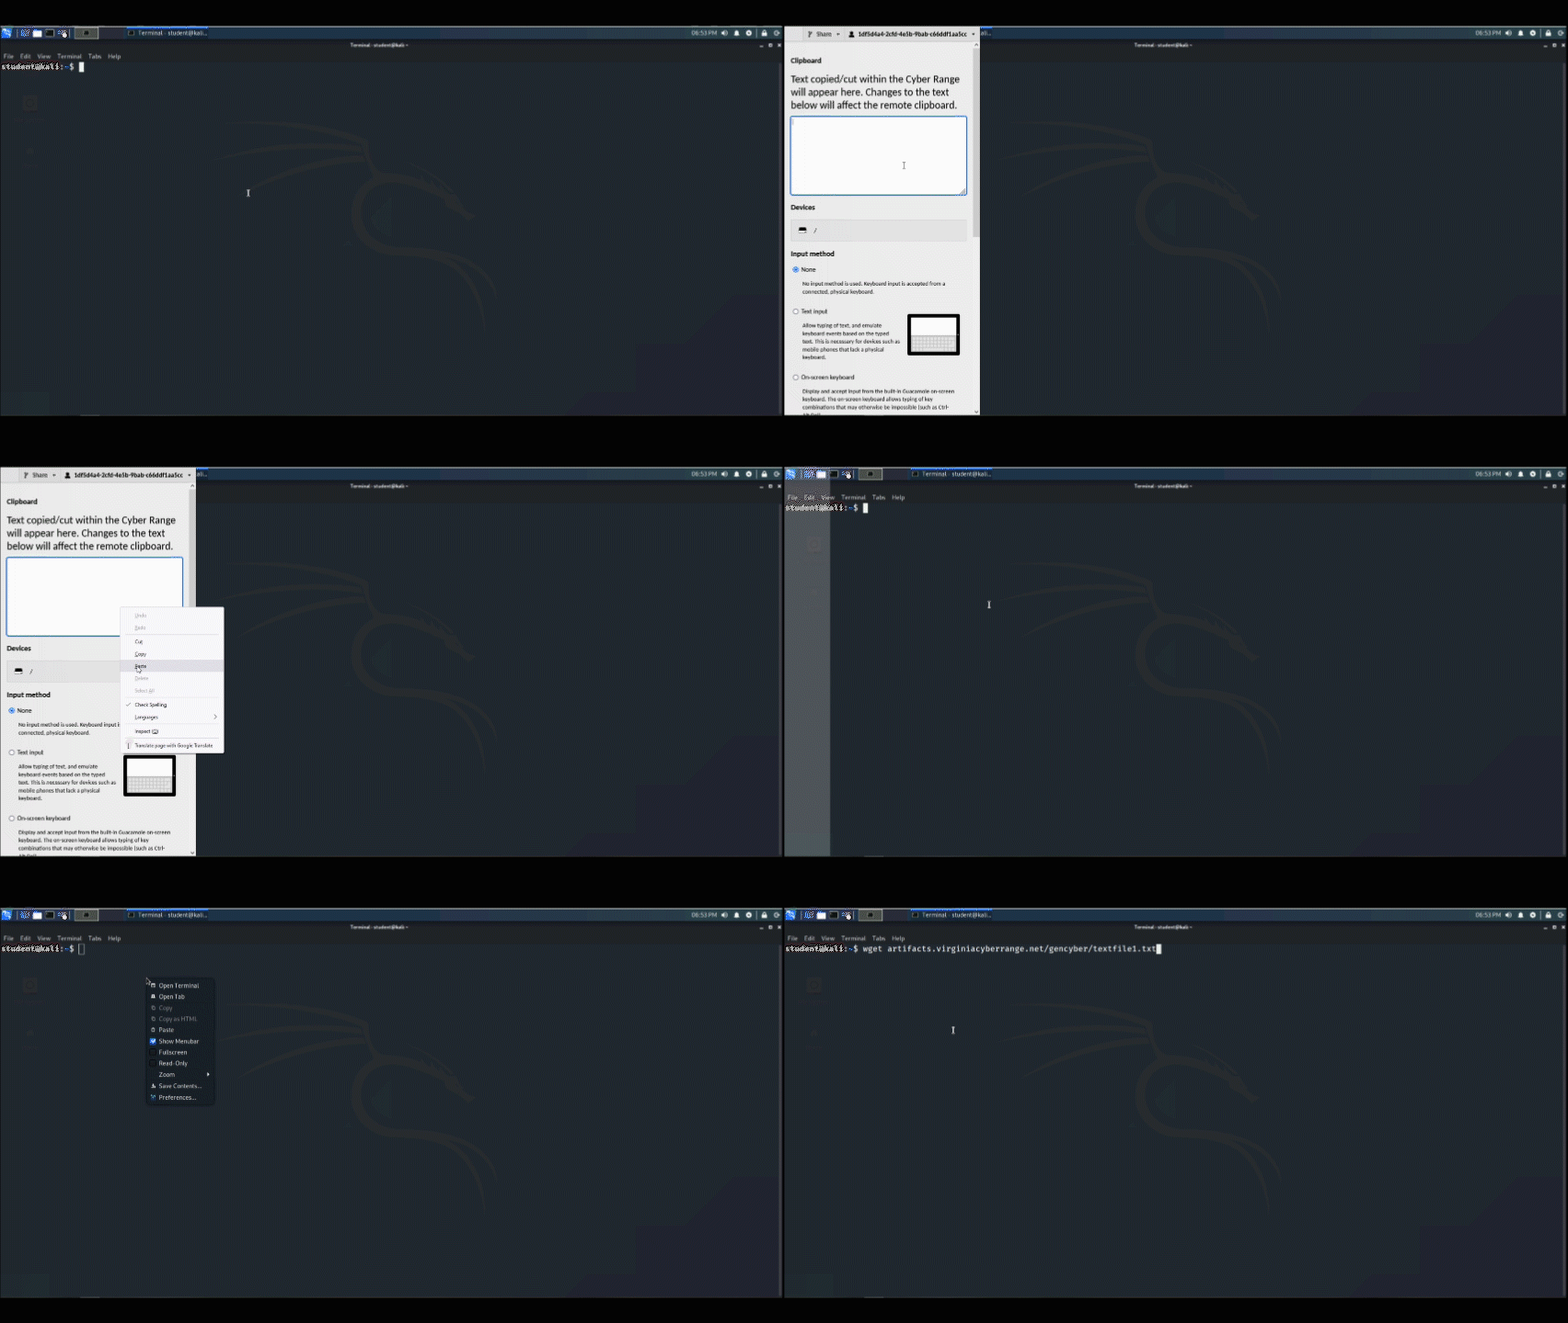
You can copy text to your computer's clipboard from an exercise environment by copying the text with a right-click and selecting "Copy" from the context menu. Application-specific shortcuts should also work. For example, Ctrl+C in text editors or Ctrl+Insert in terminals will copy the text to both the environment's Clipboard and your computer's clipboard.
To copy and paste text from your computer to your exercise environment, you can follow these steps:
- Copy the text from your personal computer.
- Open the Copy/Paste/Upload Side Panel using Ctrl+Alt+Shift (Ctrl+Option+Shift for macOS.)
- Paste your text into the Clipboard text area.
- Close the Copy/Paste/Upload Side Panel using Ctrl+Alt+Shift (Ctrl+Option+Shift for macOS.)
- Paste the text within the exercise environment. You can use an application-specific shortcut or you can right-click and select "Paste" from the context menu.

Note
The copy/paste feature is impacted by the security features of some browsers. Browsers might block copy/paste directly from your computer into the environment and back out. It is recommended to copy and paste from the sidebar when inside an exercise environment.
Uploading Files
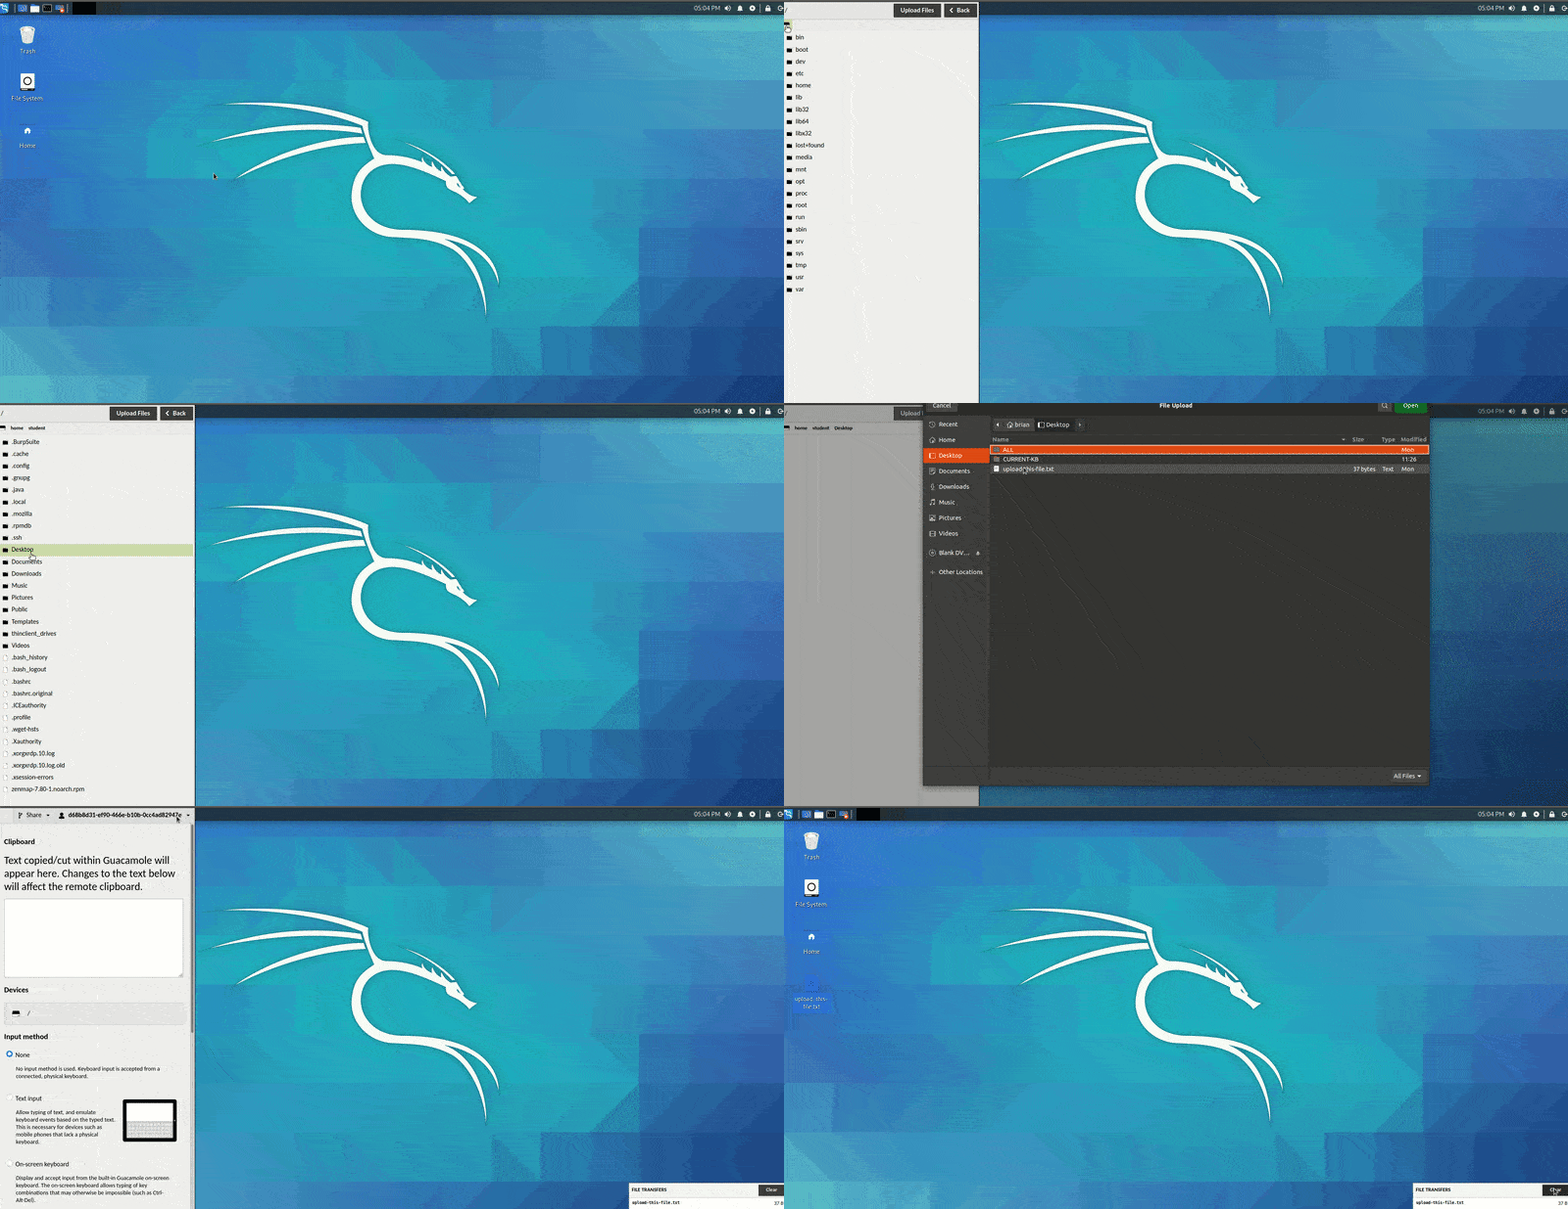
You can upload files by accessing the side-panel within your environment. The following steps will walk through the process:
- Press Ctrl+Alt+Shift (Ctrl+Option+Shift for macOS) to open the panel.
- Click on the directory icon within the Devices section.
- Navigate to a directory where you have permission to upload a file (for example, your user's home directory.)
- Click on Upload Files.
- Once you have selected a file to upload, you may then close the window by pressing Ctrl+Alt+Shift (Ctrl+Option+Shift for macOS.)
The example below shows a file being uploaded to the Desktop directory.

Note
If you cannot see the Devices section, file upload is not supported on that exercise environment. Only our Linux exercise environments currently support file upload. All Linux catalog items we have published with "2020" or newer in the name should support file transfer.
Uploads are done using the default user account (typically student). This means the upload will fail if you try to upload a file to a directory the user is not allowed to write to. Uploads should go to a safe directory, such as under /tmp or /home/student.
Please note that this feature is NOT recommended to be used for students to upload "large" files. While there are no limits on file size in place, you'll be constrained by the upload speeds. If you need to get a large file onto the system, consider getting the files from within the exercise environment's browser. The environment's download speeds are typically faster than uploading files to the environment.
Drag and Drop Uploading
In most exercise environments, you may also upload a file to your environment by dragging and dropping it. When doing so, the file is transferred by default into the home directory (or student folder in Windows) instead of the desktop. Your file will not appear on the desktop after dragging and dropping it in the environment, you must open the home or student folder in your exercise environment to access it.
You may select and drag multiple files into an environment at once, but you cannot drag and drop folders.
Warning
The file drag and drop feature is not supported in the Kali with Vulnerable Windows (Windows VM only), Windows Server 2016 (2022.11), or Windows Server 2019 (2024.7) environments.
Downloading Files
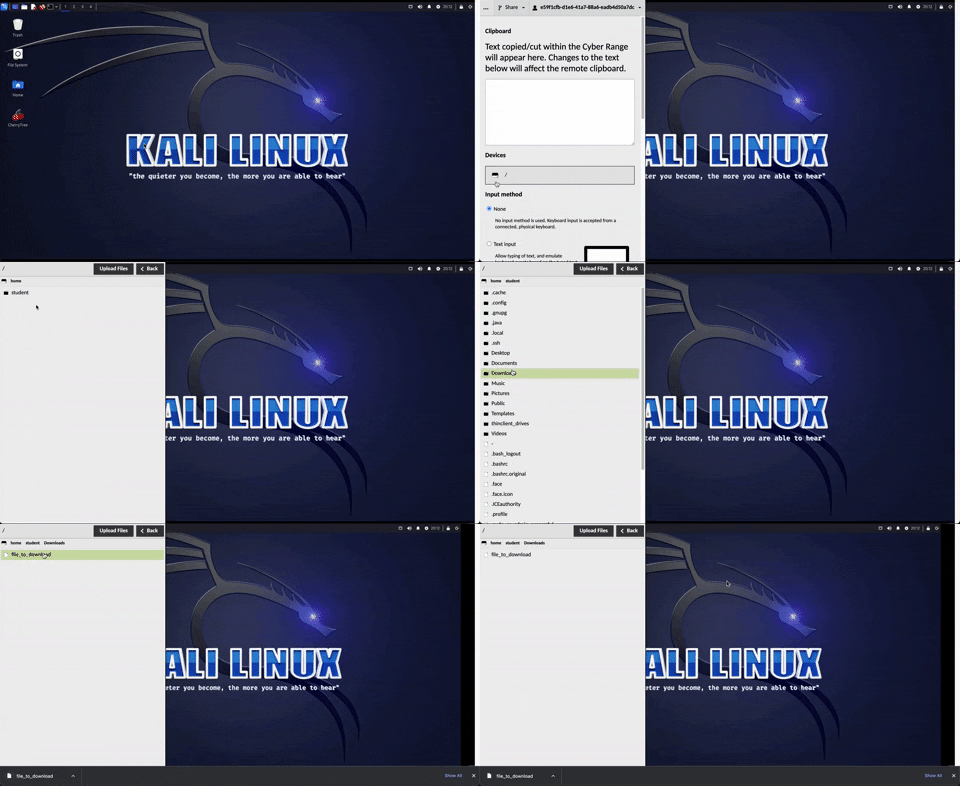
You can also download files by accessing the side-panel within your environment. The following steps will walk through the process:
- Press Ctrl+Alt+Shift (Ctrl+Option+Shift for macOS) to open the panel.
- Click on the directory icon within the Devices section.
- Navigate to a directory where you have permission to download a file (for example, your user's home directory.)
- Click on the file you wish to download.
- Once your file has downloaded, you may then close the window by pressing Ctrl+Alt+Shift (Ctrl+Option+Shift for macOS.)
The example below shows a file being downloaded to a local machine.

Accessing Files Via the Exercise Environment's Browser
You can use your environment's browser to upload or download files. Using the browser within your environment, you can access tools such as shared drives or cloud file storage platforms (for example, Google Drive) to upload files from your exercise environment or download files to your environment.
Have a Question? Contact Support
We're here to help you. If you still have questions after reviewing the information above, please feel free to submit a ticket with our Support Team and we'll get back to you as soon as possible.
Thank You for Your Feedback!